Prototype
Grey Boxing


I grey Boxed my level in preparation for adding in the graphics and additional mechanics, this allowed me to get a sense of the size of my levels and play test it to make sure it was right before starting to add in further elements such as graphics and sound. I translated my level design plans into 3d and tried to keep the scale of everything as I had in my plans which I did by putting my level plan onto a plane in unity and then used it as a floor plan and then started by adding in simple cubes and forming the walls of my level and since its just a grey box I didn’t make the corners and instead just made everything connect in a straight line since it wouldn’t affect my testing that much. I decided that I would adapt my player to the size of the environment instead of the other way round since it would be easier for me to just change the players size rather than each piece of the environment. At first the player was quite small so I doubled the scale from 1 to 2 and while it was better the player still seemed a bit small so I then changed just the players height from 2 to 3 and really liked it however I continued and tried a height of 4 but preferred 3 so I went back to that.
Mechanics
Keycard And Keycard Doors

The first mechanic I added was the collectibles which I did by adding the collectable script to the player and then added in a simple cube for the player to collect and then put that into the script as the collectable, I then tested to make sure it worked which it did. I then made it so when the collectable is gotten that it then hides the door to the room it should open and then I tested that to make sure it would work which once again it did. Since this is only a prototype I just want to make sure I can get stuff working which is why in later builds its likely that I will make it reveal the trigger box to open the door instead however for now this works as a demonstration of the mechanic. When putting my collectables into my prototype and making sure they worked I then put them in the locations seen in my level plan since that forces the player to explore a vast amount if not all of the playable space meaning that nothing goes to waste plus with my maze like layout that I went for it means that the player could get easily lost while trying to find the next collectable which would help with my games more creepy type of horror.
Doors


Next I added in the doors to my game which I did by first creating a cube to be the door and then created another cube to be the trigger zone for the door, I then gave the trigger the door slide script and changed the values so the door slides to the right when the player is in the trigger zone which worked with no issues. I decided to use the door slide script instead of the door swing script because having my doors slide open fits with my sci-fi theming more and I believe also works better for horror as well since the door could slide open to reveal the monster right in front of the player which would be quite scary.
Enemy


I then added in my enemy, since its only a prototype I just created a black rectangle to be my enemy until I added in the actual model later. I added a script which allowed me to create a path for the monster to follow which I did by creating several cubes which I named patrol point and then dragging them onto the script so that the AI would go to each patrol point, I then edited the chase aspect of the script by making the chase object be the player and then increased the range of it since by default it was a bit low. I then had to create the navigation mesh for my AI to use so I did that via the navigation menu, I had to make each element of my game walkable or unwalkable for the AI which I did and upon competition I then baked the navigation mesh. I then tried out the AI and found it worked pretty well however I then came across an issue which was since my doors open and close the AI would still not walk through them when they were open since it was set to unwalkable, I then started thinking of what I could do to remedy this problem and at first I had the idea of just making it so the AI could go through doors since it was a slime monster so it would make sense for it to be able to do so, but I only wanted to do this easy fix if I couldn’t get it to not go through doors when closed but go through when they were open however after looking at the navigation menu I realised that in order to make something walkable or unwalkable I had to tick a check box of navigation static which while I did not know fully what that meant I beloved that due to the name it had something to do with stationary objects hence so I unticked the box to see what would happen and then re-baked the mesh and found that it would now go through the doors when they were open. Since its just a prototype after more testing is done and I have some player feedback the speed of the AI is up for change since I doubt I will have gotten it perfect after such a small amount of time.
Menu And End Screen


I also decided to include two other scenes for my start menu and victory screen however due to it being a prototype they are currently empty, after added in the scenes I then added a cube in my main level and added in the load new scene script so that upon the player touching would take them to the victory screen and then I made it so on the menu if the player pressed space it would take them to the main level via the same script. I then tested this to make sure it worked which it did. I used a trigger so that the player would only be able to use this feature when at certain locations since it wouldn’t make sense if the player could do this at any moment.
Cameras


I creating a basic camera system which will be used in my game by creating two cubes one which is a trigger zone that if the player enters will reveal the other cube which is the camera manager which has the camera swap script on it which means when the player presses the set key it swaps to a set camera, after I got both of these cubes set up I then added a new camera and placed it into the script and tested the mechanic which at first did not work until after checking I realized I made the simple mistake of forgetting to set my trigger as a trigger in its properties and once I had fixed that it worked fine.
Goop And Crouch


Next I created my goop obstacles for my game, I did this by creating a cube that would block the players path and then I gave it a dark texture so it stands out, I made sure the enemy could go through it or else the player could easily abuse these obstacles which I did by going to the navigation mesh and setting it to walkable. After all of this I then dragged in the crouch script and set that up by setting the key to the left control since that’s the standard for most games and then I enabled toggle so the player would not have to hold control to crouch. My obstacles are meant to slow the player down which can help give the enemy a chance to catch up during a chase and rewards players who learn their environment plus it might even allow for the monster to sneak up on the player due to it blocking their vision.
Alarm

Next I made the alarm which I did via a spotlight, I then changed the colour to red and enabled the draw halo. Due to the intensity being so low the only thing visible is the halo and not the actual light which is what I wanted, because I want the alarm to flash on and off I set the lighting to real time. After having set up the spotlight I then added the flicker script to my game manager and set the flickering object as the spotlight, I then tested to make sure it worked which it did.
Flickering Lights


Next I made the flickering light which I did via a spotlight, I then changed the colour to white, I then increased the intensity being so the light was visible. Due to how I want the light to flash on and off I set the lighting to real time. After having set up the spotlight I then added the flicker script to my game manager and set the flickering object as the spotlight, I then tested to make sure it worked which it did. The values of this are up for change after I start improving my lighting and graphics during my next stage of production.
Jumpscares


Lastly I made a privative jumpscare by creating a new scene which I named jumpscare and then creating a small black room with two red spheres which were the emissive ones used on my enemy, after doing that I placed a camera in front of it and added the load new scene script to the scene and set it so that upon pressing space the level scene is loaded.
Updated Production Schedule

Above is my production schedule after my prototype is complete, I have managed to stay on schedule for all of my prototype which surprised me a little as I expected something to be harder than anticipated, compared to my first production schedule I have moved most of my graphics forward by a day since originally I was going to get some of it done on Monday however I was unable to do that since I forgot that I had plans for that day. I am confident that I should be able to follow this new schedule to get my remaining task’s completed on time.
Graphics
Collecting My Graphics


Before I could start implementing my graphics I had to obtain them whether that be creating them myself or finding some premade assets, Due to my lack of confidence in my Maya skills I decided to use pre-existing assets for all of my assets since they would look better than what I could have made and it would save me a lot of time that would be needed for other aspects of the game such as sound. I first found a sci-fi modular pack which was a collection of assets that contained almost everything I needed for my game. I then imported it into unity and checked what remaining assets I needed to find, after some time checked I found that I still needed blood splatters, a monster, alarms and keycards. After looking for those assets I managed to locate some good blood decals and a pretty good monster that would require some retexturing however that was something that I could do easily. I was unable to find a good alarm or keycard model that I could use so I decided since they are simple assets I could easily just make them myself in unity when I needed to implement them. After having found everything I needed I imported the packs into unity.
Rooms And Corridors


The first thing I went about implementing was the main facility itself including the rooms throughout, I kept my grey boxed version in for scale and removed it once I no longer required it. I used the prefabs found in the asset pack to create all the corridors however I quickly found that making sure each corridor connected properly was quite hard to do so I used the snap to grid feature to help me do so but even still it took quite some time to line everything up perfectly so eventually I stopped trying to make it all perfect since it was starting to take too long. To create my rooms I used the floor and walls prefabs to manuals create each room, while creating the rooms I figured that I would have to change the size when compared to the grey boxed version since the rooms were a bit too big and so due to time constraints would be less detailed so I decided it would be better to just make the rooms a tad bit smaller than sacrifice the level of detail.
Decorating Rooms


Next I set about adding detail into the interior of my rooms which I once again used the decorations and machines prefabs from the asset pack I had been using, I made sure to make each room felt different from each other which I did by making them contain very different things. I gave each room a unique theme, the first room I wanted it to be like a safety vault, for the second room I wanted it to be like a storage room, for the third room I wanted it to be a generator room, for the fourth room I wanted it to be a machine room, for the fifth room I wanted a sort of barracks/dorm type room, for the sixth room I wanted a security office and for the final room I wanted a simple elevator. I found decorating each room to be really easy since I already knew what I wanted to do with them and had the assets ready to use, all I had to do was resize them and start placing them in my desired location.
Doors
Karboosx.net. 2021. Karboosx – Sci-Fi Styled Modular Pack – How to make door to work. [online] Available at: <https://karboosx.net/blog/post/sci-fi-styled-modular-pack-how-make-door-work> [Accessed 13 December 2021].


Next I implemented the doors in each doorway I had left, the asset pack had a prefabs for several different doors so I used the one that I liked the most and would fit in the most however they did need an increase in size as they were way too small by default. The prefab came with an opening and closing animation however after some testing I found that I did not know how to actually open and close these doors, I took a look in the pack to see if there was something I was missing however I found nothing so I then decided to look if the person who made the pack had talked about how to get the doors working and luckily on their website was a script that could be used to get the doors working. I then copied the script into unity and applied it to all the doors and then tested to make sure it worked which it did.
Keycards And Keycard Doors


After having gotten my doors working I then tried to create my keycard doors, I managed to create these with no issues since I had the required script and understood how it worked. Originally I was thinking about making it so that only the door script activates when the keycard is collected however I then remembered that I did not know how to do that and then decided I could just have two doors, one was a fake door that did not have the script required to open which are hidden when the player collects the keycard to open that door and the actual door that has the script to open is then reveals which I did via the collectable script I had been given. I also realised that with this method that when I did the audio for my doors I could then just make a trigger for the door opening sound reveal when the real door is revealed.
Camera Areas And UI


I then applied graphics to my cameras by creating a small and simple environment for each camera to view, I then realised that the player has no way of knowing how to work the camera’s so I added in a UI with some text that appears while near the camera’s telling the player how to swap between them and I also realised that while I was doing the UI I should add some tutorial text explaining what the player must do in the starting area. The camera’s are a completely optional thing that the player could miss however it rewards those who find it since at this point in the game it gives them their first look at the monster.
Alarms


To create my alarms I simply made a capsule and then applied a material I created which was emissive with red light, with a simple model for the alarm created I then gave it a red coloured spotlight however I made it so that it would not actually create a spot light and would instead create a small area of light which I did by enabling draw halo. By doing this it created the desired effect and after messing about with the values I got it just right, I then applied the flicker script to the spotlight via the game manager I created so that the light would turn on and off to give the effect of an alarm going off.
Lighting And Flashlight


Now that I had a good amount of my graphics implemented I started to introduce lighting, the first thing I did was lighting was give the player a flash light which I would have done in prototyping but I did not want to get caught up trying to do lighting during that stage of production. I gave the player the script and attached a real time spotlight to the first person camera so that it followed it around and would update in real time, I then messed around with values until I got it just right because I didn’t want the light to be too revealing or reveal too little. When deciding the controls for it I settled on F to toggle the light on and off since I have seen that used in other games and believed it would also work for my own game.
I had a ceiling light asset in it however it came with in built lights which I decided to remove, I then made my own prefab using the model from the asset pack but then adding in my own spotlight to it which worked really well I then added one light to each junction in the corridors since overall I want my game to be quite dark. With that done for the corridors I then set about adding lights to the many rooms, each room ended up with different amounts of lights such as how the starting area had a dim but big light around the middle that illuminated the edges, however for other rooms I tended to make it so there was an good amount of light in the room and in some cases I used the lights to draw the players attention to the keycards hidden in the room such as the storage room which had a light shining near the keycard or the generator room which I did the same in.
With all my lights added to my game I then started to set some of the lights to real time since I was going to make them flicker on and off randomly via the flicker script that I would attach to my game manager asset, I didn’t want to have too many flickering lights so I tried to limit my usage of them for important lights such as the lights in the rooms that I put there to draw attention since by having them flicker it would further draw the players attention. I also made a few lights in the corridor junctions flicker to increase the creepiness of my games atmosphere and also since they could be used as identifies to help the player know where they are.
When finishing up my lighting I was about to remove the directional lighting that came already in the scene however before getting rid off it I decided instead to lower its intensity down from a 1 to 0.2 and found that I actually quite liked how it looked so I then tried other values using 0.2 as a baseline and after a bit of testing I settled on 0.1 as it gave my game a bit of natural light that I think really improve the overall look of everything. Overall I am very happy with how my lighting worked out as it looks almost exactly like how I had imagined it to be and am very happy that I had no issues since this was my first time using lighting in unity, by doing this I am now more confident in my ability to be able to create my own lighting in unity for future projects.
Monster And Goop


Before adding in the model to my monster I needed a new texture for it and the goop obstacles and eventually I found a good texture since it was almost exactly like what I had in mind, I then imported it into unity and applied it to the obstacles to see how it looked. The texture worked really well as it looked good and due to my games dark lighting it fit right in with the rest of my game pretty well plus the texture helped the obstacles block the players sight better and at times could even be mistake for the monster for a brief second. After having decided that this texture would also work for my monster I then set out to implement the graphics for that next.
Since during my prototype I had already created the AI for my monster when adding in the model I just made the model a child of the already AI so that it would appear over it, the prefab for the monster came with animations that it cycles between during different states so luckily I didn’t have to mess around with getting the animations working myself which saved me some time. I then needed to retexture the model so that it looked more like my design seen in my planning, the first thing I did was the eyes which were a child of the model so I just selected them and gave them the same material as the alarm since that would give it glowing red eyes like I wanted since it would stand out in the darkness of my environment so that the player would be able to clearly see the monster. For the main model I added in the material that I had used for my goop obstacles since it is meant to be made out of the same stuff of as the monster so reusing the material made sense plus it would help to make the rest of the monster sort of blend in more with the darkness of the environment.
Jumpscare


Now that I had my graphics In I could improve my jumpscare, I did so by taking my pre-existing prototype jumpscare and removing the floating eyes in favour of adding in the monster model I now had, I also added some text explain how to restart and a red flickering spotlight over the monster model so that you could occasionally see its body. I am happy with how this jumpscare looks as I’m not trying to be outright scary with my game and am instead going for a creepy feeling instead which I believe this does pretty well.
Victory Screen


Now that I had my graphics In I could improve my victory scene I started by adding in a wall for the background and then the floor, next I added in the monster peeking over the floor a little bit and some text telling the player that they had won. While its nothing particularly impressive I believe that it gets the job done pretty well since it fits with the is it really over ending of my game.
Menu

I started to create my menu scene, I decided to use the computer design as seen in my planning documents since I had the assets to do that and I liked that design too. I used the sci-fi modular pack to put down a plain floor and a simple wall behind it, I then placed down the desk with computer prefab and moved the scene’s camera to a good position. With a nice looking clear scene built I then implemented the text, I did so by creating a canvas and then adding several text’s to it and positioned them on each of the monitors and one above the middle monitor. I then made the middle monitor one explain how to start the game, the left monitor explain the controls, the right monitor explain the players objective and lastly the text above the middle monitor say the games name. I then decided to change the font to something more fitting and after I found a suitable font I imported it into unity and changed all the text to it however for the games name I decided to use a different version of the font which was only the outline of the letters since it made the games title stand out more which is important. Next I changed the font size and moved the text around a bit just to till everything looked good. Overall I am very happy with how my main menu came out as I managed to stick very close to the plan however I added some more elements to it that I though were important such as the controls and objective since that way the player learns what they are meant to do and how to do it before loading into my game.
Sound
Collecting Sounds

With my graphics complete I then moved onto sound, I then collected all the audio files I needed and tried to make sure that they were saved in the wav format since that works best for unity, luckily I was able to do so and after having got the last of my sounds imported them all into unity in a folder named audio.
Applying Sound
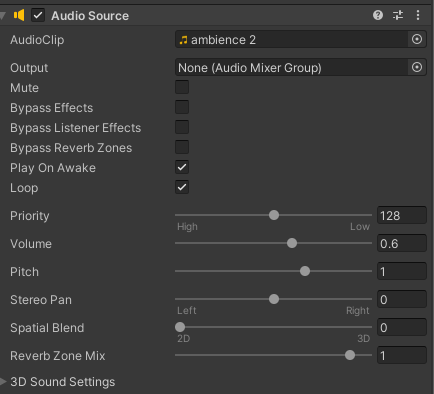


I then started to add in my sounds to my game I started with getting the music and ambience added since they were the simplest, I added the audio to an object in my scene. I then had to change the volume until the sounds were loud enough that the player could hear them but also had to make sure you could hear other pieces of audio that I was going to add, I also had to make sure that I kept the spatial blend at 2D since I wanted it to be at the same volume throughout the entire level. After having done the ambience for my level I then added the music and ambience to my menu. Since I wanted these sounds to play continuously I had to loop them.
Next I went about adding in sound effects throughout my game, some were very easy since I had places in already existing scripts were I could add audio to be played such as in the collectable script so I just added the collectable sound to each instance of that script. For other sounds such as the monsters footsteps I had to add an audio source to the object and make it so the spatial sound was set to 3D and limit the range of the sound so it could only be heard when the creature was close to the player, and once again I had to loop this piece of audio. I had to use the 3D looping audio again in other places such as my camera static sounds, alarm sound and generator sound since I wanted those to come from the objects. Getting to use 3D audio helped to make the sounds feel more realistic due to the volume change depending on the distance which works really well in my creepy environment. Now for the door sound I instead needed a trigger around the door which was a similar size to the door opening zone so hat would play a sound for when the player entered and left the zone which would give off a door opening and closing sound but luckily this was easy to do as in my last project I had used the on trigger play script and all I had to do was use that again. I also used the trigger technique for audio for my goop obstacles which I wanted to play a sound when the entered them. Another way I did audio which I only did for the main menu was the on key press play script which I added to the game manager in that scene and set it so when space is pressed it played the menu select sound, with this it played the sound when the play hits space to start the game. For my jumpscare and victory screen sounds I just added an audio source to an object in that scene and set it to play the desired sound which would then play when that scene loaded.
Overall I think the sound in my game ended up pretty good, since I messed around with the audio and priory levels I managed to get most of my sounds to a good balance with each other and due to my experience from last project I had no issues adding sound to my game.
Quality of life improvements


During the end of production I fixed and added a few simple things just to make my game look a bit better, the first thing I did was fix some clipping issues I had which I did by changing the y position of my floors and roofs by 0.01 since I hoped that this would fix it which luckily it did. Another thing I did was add a timer so the player could see how long they had been playing for their current life, this was simple enough to do as all I had to do was go and grab a script and add some text to the UI which was used as the timer. My lights on my main menu also broke near the end of production for some unknown reason so I just deleted them and added some new lights which luckily fixed the issue.
Updated Production Schedule

Above is my production schedule for my final week of the project, as can be seen I managed to complete everything I set out to do. Due to the time I gave myself I now have two days left in the project to improve any existing work and finish some of the write up for this project which is enough time for those things. I am very surprised that I managed to get everything done on time since looking back I did give myself a lot more work than usual this project due to the scale of my game.
